

|
Onsite Installer: Edit Installer Templates |
The Edit Installer Templates page allows the user to create and edit templates that are used during the Onsite Installer Process. You can create and save as many templates as you need for your customer base. Template settings are applied to customer emails and Onsite installations during the Onsite Installer Process.
Steps for Creating a new Onsite Installer Template:
Step 1: Log into Central as an Administrator (Main Admin page displays) and click on Onsite Installer section. Then click on Edit Installer Templates link. This will display the Onsite Installer Edit Templates page.
Note: When you first navigate to the Edit Installer Templates page, the Default template is displayed and the Installer Process tab is selected.
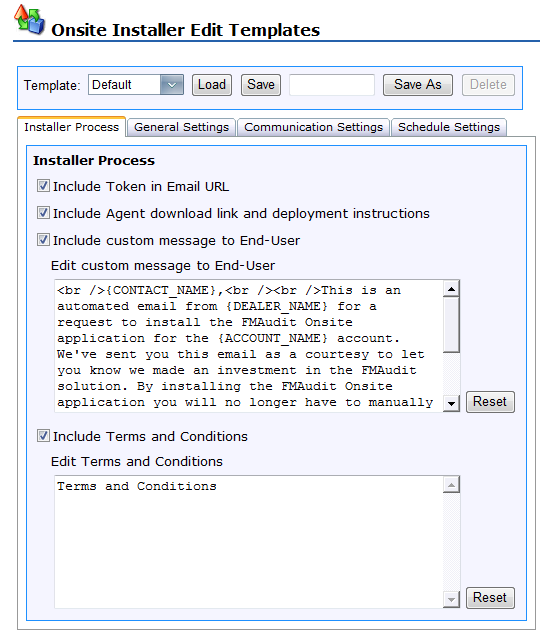
Step 2: In the Installer Process tab, select the options you want to include in the Onsite Installer email that is sent to customers. The following sections describe each option.
Include Token in Email URL: allows the user to add a token to the Central Onsite Installer link that will automatically log the user into Central without requiring a username and password.
Include Agent download link and deployment instructions: allows the user to add an Agent download link and Agent deployment instructions link to the Onsite Installer email.
Include custom message to End-User: allows the user to add a custom message at the very beginning of the Onsite Installer email.
Edit custom message to the End-User: allows the user to edit the custom message that is included in the Onsite Installer email. The CONTACT_NAME, DEALER_NAME, and ACCOUNT_NAME place holders are populated with the correct values at runtime.
Include Terms and Conditions: allows the user to add terms and conditions to the Onsite Installer email.
Edit Terms and Conditions: allows the user to edit the Terms and Conditions that are included in the Onsite Installer email.
Step 3: Click on the General Settings tab and select the options you want for the Onsite Installation. The following sections describe each option.
Onsite License: allows the user to add a license to the Onsite installation. If the user forgets to add a license, a warning will display.
Brand Onsite: allows the user to add a customized image that replaces the FMAudit logo.
Synchronize Network Settings: select this option if you want Onsite network settings to synchronize with Central network settings. This means that any change to Onsite network settings will be applied to Central and vice versa. The most recent change to network settings takes precedence. For example, if the network setting in Central were changed last, then both Onsite and Central will use those settings. This allows the user to make changes to network setting in Central instead of traveling back to the customer site to make network setting changes in Onsite.
Generate Random Onsite User/Pass Pair: allows the user to add a random Onsite User/Pass pair that is used for authentication during Onsite synchronization with Central. The username and password is added to the Onsite “FMA Central” section under Settings. You can also see and change the User/Pass pair in the Central Synchronize Data section under FMAudit Onsite.
Specify Custom User/Pass Pair: allows the user to customize the User/Pass pair used for Onsite synchronization with Central. The username and password is added to the Onsite “FMA Central” section under Settings. You can also see and change the User/Pass pair in the Central Synchronize Data section under FMAudit Onsite.
Create Administrator password for login to Onsite: allows the user to create an Administrator password for logging into Onsite.
Create Guest password for login to Onsite: allows the user to create a Guest password for logging into Onsite.

Step 4: Click on the Communication Settings tab and select the options you want for the Onsite Installation. The following sections describe each option.
Specify custom HTTP Port: allows the user to change the default HTTP (33330) used by Onsite. This port number should be changed if another application is using it or if it is being blocked for security reasons.
Specify SSL Certificate: allows the user to add a client side SSL certificate. The FMAudit Central IIS website must be configured to work with client side SSL communication.
Include Multicast 255.255.255.255 subnet address: allows the user to add a Multicast subnet address to the Onsite network settings. Only select this option if you don’t know the customers IP subnet ranges.
Specify custom Communication Network Settings: allows the user to change the default SNMP community name (public) and various time-out settings.

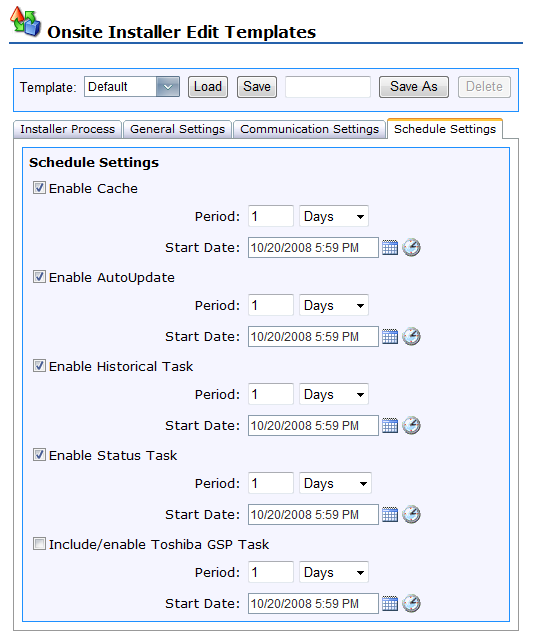
Step 5: Click on the Schedule Settings tab and select the options you want for the Onsite Installation. The following sections describe each option.
Enable Cache: select this option if you want Onsite to cache network information. This option is only designed for very large networks where the Onsite audit takes several days to complete. If this option is enabled, the cached network information will be refreshed based on the period selected.
Enable AutoUpdate: select this option if you want Onsite to automatically check for updates on a scheduled basis.
Enable Historical Task: allows the user to schedule how often Onsite will perform audits to capture various meter volumes and device information (i.e. manufacturer, model, serial number…).
Enable Status Task: allows the user to schedule how often Onsite will perform audits to capture consumable levels and device status.
Include/enable Toshiba GSP Task: allows the user to schedule how often Onsite will perform audits to capture various meter volumes and device information. This options is specifically designed for sending data to the Toshiba GSP website.
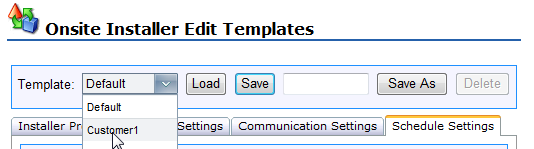
Step 6: Enter a name for the template and click on the Save As button to save the new template settings.

Step 7: Verify that the template has been saved by clicking on the Template drop down box. You should see the name of the template you just saved.
|
Copyright © 2008 FMAudit, LLC. All Rights Reserved. |