
|
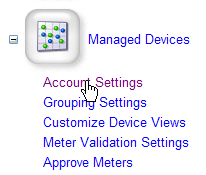
Managed Devices: Account Settings |
The Account Settings page allows you to view an account and device summary (Parent account name, number of managed and non-managed devices, number of Orphan EquipID's, ERP Account Name) with or without filters, change the frequency of both ERP sync and meter validation, and select meter validation for a selected account. In addition, you can click on an account name from this page to access the Device Management View for the corresponding account.
By default the ERP syncs included in the Synchronization module on the Main Admin page, will submit the meters to the ERP applications on a global interval defined by their parent account (Main Dealer or sub-dealer), i.e. daily will submit an updated meter every day for each device in all accounts. It may be preferred to specify the frequency of submission on a per-account basis, i.e. Account A is submitted on the first day of every month, whereas Account B is submitted weekly to allow for multiple contracts on different billing cycles. This page allows you to specify the frequency settings that apply to both the submission of new meters to the ERP and if selected, the validation of the meters prior to submission.
Here are the steps for changing the frequency of both meter submission (to an ERP system) and meter validation, and selecting an account for meter validation:
Step 1: Go to the Main Admin page and click on the Managed Devices module. Then click on the Account Settings link. This will display the Account Settings page.
![]() Alternatively, on the
Meter Validation Settings page, you can click on
the Select/Configure Accounts button to display
the Accounts Settings page.
Alternatively, on the
Meter Validation Settings page, you can click on
the Select/Configure Accounts button to display
the Accounts Settings page.
Step 2: Select the account you want to modify from the Dealer Account drop-down box.

Step 3: If you want to view only accounts with managed devices (Dealer owned devices that are on contract), then click on the View Filter check box so that a check mark is displayed in the box. Otherwise, leave this check box unchecked and go to the next step.
![]()
![]() By default, all accounts are listed.
By default, all accounts are listed.
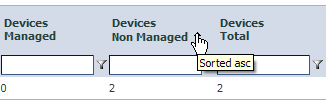
![]() Columns with an up/down arrow below
the header name allow you to click on the header name to sort the data in the grid
either ascending or descending based on the values within that column.
Columns with an up/down arrow below
the header name allow you to click on the header name to sort the data in the grid
either ascending or descending based on the values within that column.
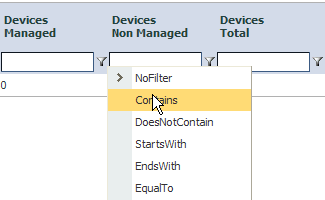
![]() Grid filters provide a robust way to
reduce the amount of data displayed in the grid to those rows with entries that
match criteria you specify. Clicking on the Filter
icon displays a list of the filters, with an option to select no filter. The
corresponding keywords or numbers are entered in the space to the left of the filter
icons. For instance, entering a number into the Devices Non-Managed column
will apply the number with the selected filter option to all values within the Devices
Non-Managed column.
Grid filters provide a robust way to
reduce the amount of data displayed in the grid to those rows with entries that
match criteria you specify. Clicking on the Filter
icon displays a list of the filters, with an option to select no filter. The
corresponding keywords or numbers are entered in the space to the left of the filter
icons. For instance, entering a number into the Devices Non-Managed column
will apply the number with the selected filter option to all values within the Devices
Non-Managed column.
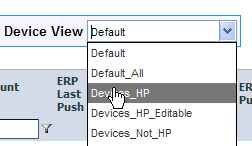
Step 4: If you want to change the device view (how device information will be displayed on the Device Management Views page), select a different view from the Device View drop-down box.
![]() This step is only necessary if you
plan on clicking on an account name and going to the Device
Management Views page. On this page, you can further customize how device
information is displayed by clicking on the Customize View
button.
This step is only necessary if you
plan on clicking on an account name and going to the Device
Management Views page. On this page, you can further customize how device
information is displayed by clicking on the Customize View
button.
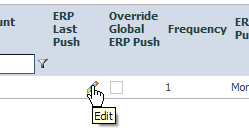
Step 5: Click on the edit link (the graphic symbol is a pencil) for the selected account. This will display the fields that can be edited.
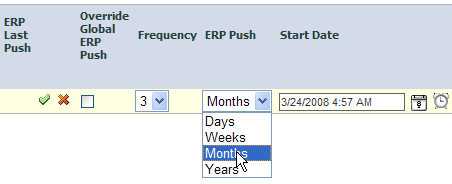
Step 6: Change the ERP push frequency (in days, weeks, months, or years), start date, and start time to your desired settings.
Here is an example of setting the ERP push frequency to every 3 months (once per quarter):
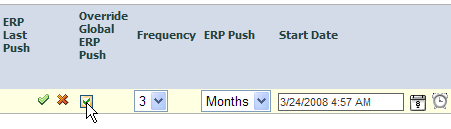
Step 7: If you want to override the global ERP push settings (these are set on the Main ERP Sync page) for the selected account, click on the Override Global ERP Push check box so that a green check mark is displayed in the box.
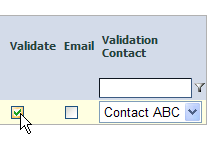
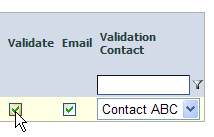
Step 8: If you want to perform meter validation (viewing the meters for accuracy and approving for submission into an ERP system) for this account before pushing the meters into your ERP system, then click on the Validate check box so that a check mark is displayed in the box.
![]() If validation is selected for an account,
the meters will not be pushed into your ERP system until manually validated and
approved for submission by a designated contact. In addition, by enabling the validation
option, the corresponding account will be able to view the Meter Validation report
from the Reports page.
If validation is selected for an account,
the meters will not be pushed into your ERP system until manually validated and
approved for submission by a designated contact. In addition, by enabling the validation
option, the corresponding account will be able to view the Meter Validation report
from the Reports page.
Step 9: If you want to send an email reminder to the person validating the meters, select the contact name from the Validation Contact drop-down box and click on the Email check box so that a green check mark displays in the box.
Step 10: Click on the green check mark to save the new settings.

|
Copyright © 2009 FMAudit, LLC. All Rights Reserved. |